Valentine’s Day is the perfect time to add a little extra love to your home decor or girls night with a DIY candle painting project! If you’re looking for a simple yet creative way to bring some festive charm to your space, painting tapered candlesticks is an easy and fun craft to try. Whether you’re hosting a romantic dinner, planning a girls’ craft night, or just love creating your own holiday decor, this DIY project is perfect for adding a personal touch to your home this Valentine’s Day.
With just a few supplies and some creative flair, you can turn plain candles into beautiful, hand-painted pieces of art that add a cozy, romantic vibe to any room. Let’s get started!
Supplies for DIY Candle Painting:
- Tapered Candle Set – Choose a set of simple tapered candles in any color you prefer. For Valentine’s Day, I went with a gradient bundle featuring reds, pinks, and ivories to keep the theme festive!
- Paint Palettes – Perfect for hosting kids parties or craft nights. I love having these on hand, they come in a pack of 12 and are reusable!
- Non-Toxic Acrylic Paint – Make sure the paint is safe to use on candles. Select a non-toxic acrylic paint set with the colors that match your theme. For Valentine’s Day, you’ll want some fun shades like red, pink, and white.
- Paintbrushes – A variety of brush sizes will help with different designs, from fine details to bigger strokes.
- Nail Design Tools – A variety of tips such as a ball tip, and very thin and long brushes help to execute the perfect mini designs with precision.
Styling Supplies:
- Textured Ribbon – Add a touch of elegance or playfulness to your finished candles with some textured ribbon.
- Tapered Candle Holders – Add a touch of elegance or playfulness to your finished candles with some textured ribbon.
Step-by-Step DIY Candle Painting Instructions:
Step 1: Gather Your Supplies

First things first, gather all of your supplies. If you’re going for a Valentine’s Day theme, I recommend purchasing a tapered candle set in soft, romantic colors like reds, pinks, and ivories. I personally bought a gradient bundle that offered these colors, but feel free to pick whatever suits your aesthetic. You’ll also need a small paint set with non-toxic acrylic paint—this will give you the versatility to mix colors or stick to a simple design.
Step 2: Plan Your Designs
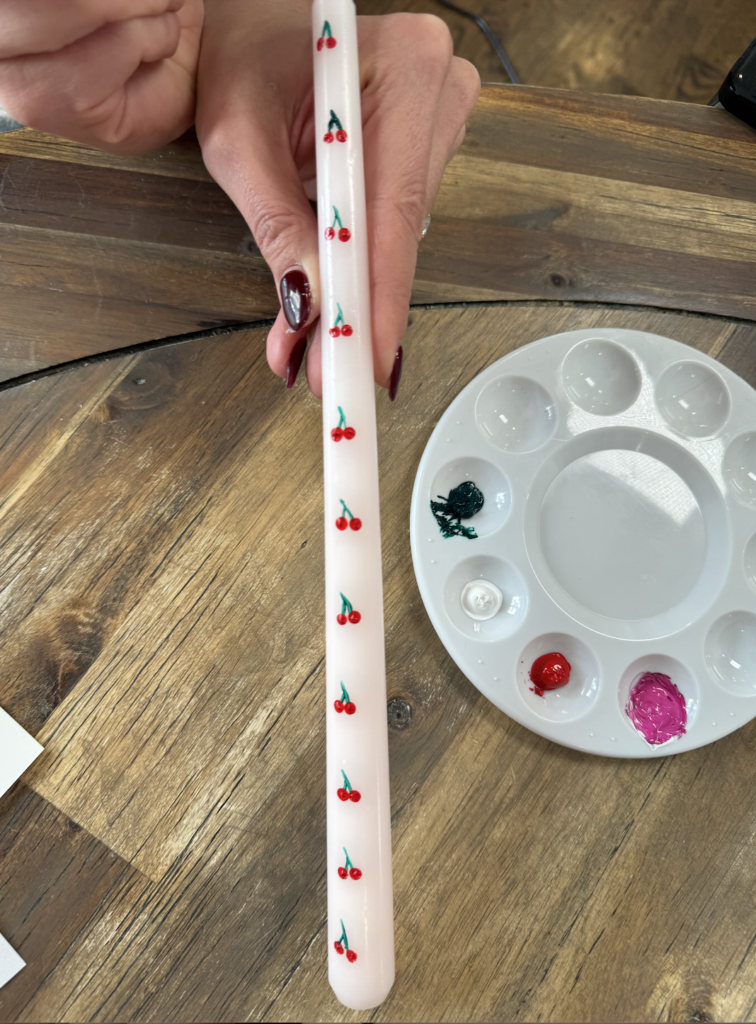
Now comes the fun part: deciding on your designs for your DIY Candle Painting! For Valentine’s Day, I chose to keep it cute and simple with three designs: hearts, cherries, and “XO”. You can get as creative as you like, but these designs will definitely set a festive mood for the holiday. I recommend testing the designs on plain paper first to get the hang of the technique before you paint on the candles.
Tips for each design:
- Heart Shape: To paint a heart, start by making a small circle on the left side of the candle. Then, drag the paint down in a curve to form the bottom point. This gives you a neat heart shape that’s both simple and charming.
- Cherries: For the cherries, I recommend using a nail art brush with a long, thin tip. Before dipping the brush into paint, lightly dip it in water to help the paint flow smoothly. Use the long tip to paint the cherry stems. I used a head of a nail pin to dot on the red cherries. This creates a crisp and clean look!
- XO: The “XO” design is perfect for those who want a more text-based touch. You can use a fine brush or even a nail art pen for clean, bold lines.
Step 3: Get Painting
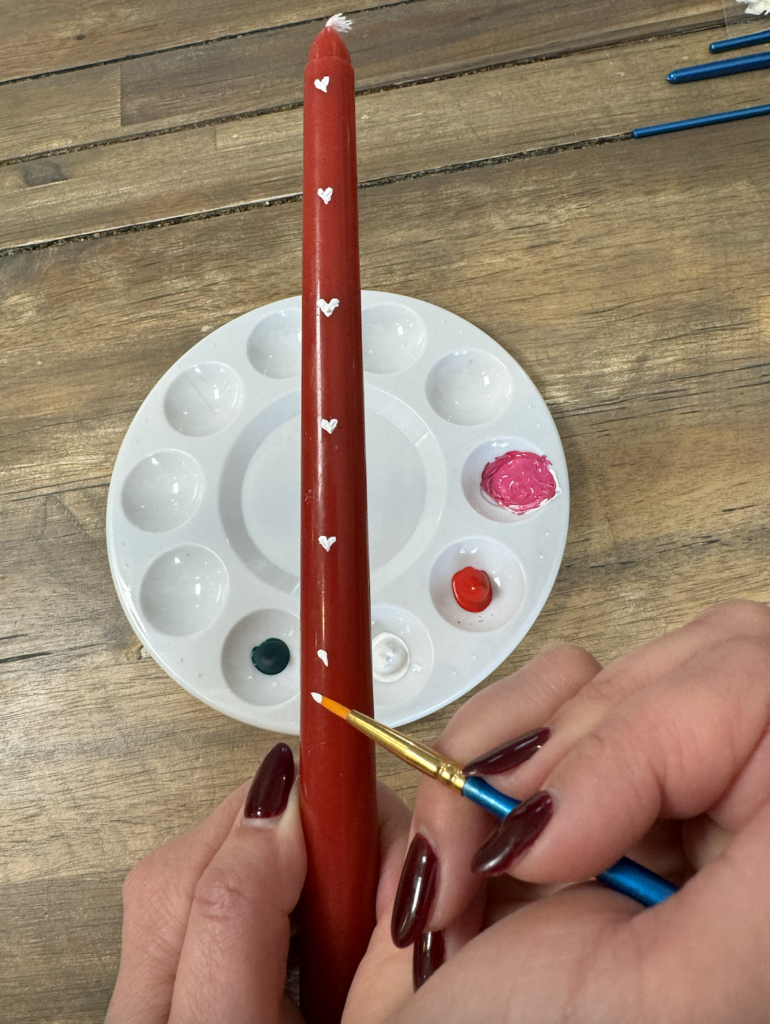
Once you’ve decided on your design, it’s time to get painting! You can either use traditional paintbrushes or, for even more precision, nail art design pens. These pens help create a neat consistency, perfect for details like hearts and the “XO” lettering. Whether you’re making a small heart or an intricate design, the pens can help you get the right thickness and sharpness. Don’t forget to clean your brushes between colors in your water cup to avoid any color mixing!
Step 4: Let Your Candles Dry
After you’ve painted your designs, let the candles dry completely before using them or displaying them. This usually takes about 30 minutes to an hour, depending on how thick the paint layers are. I like to place them into their tapered candle holders to let dry!
Step 5: Add Final Touches
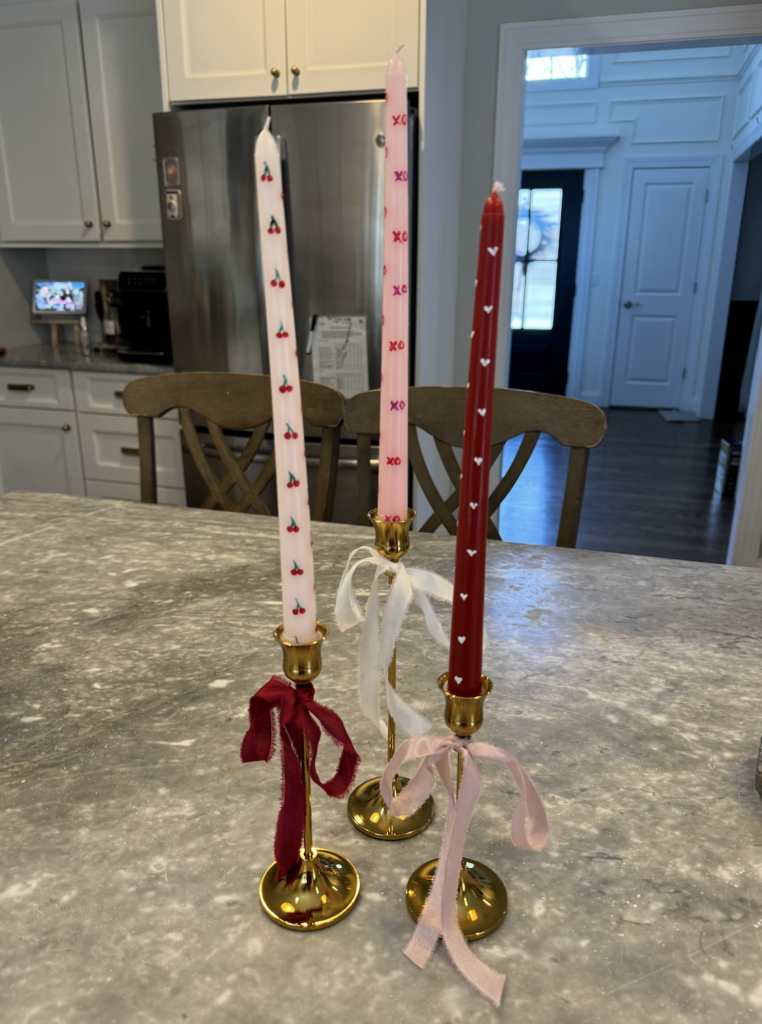
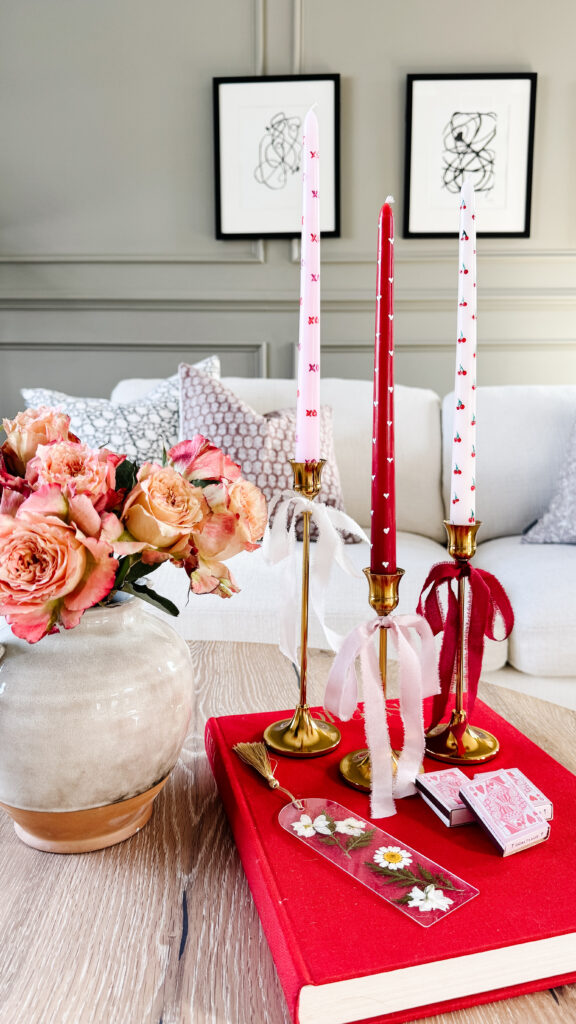
Once your candles are dry, it’s time to add the finishing touch! I love wrapping my painted candles with a cute, textured ribbon that complements the colors and design. It’s an easy way to elevate the look and tie everything together.
Tips for Perfect Results:
- Practice on Paper: Whether you’re doing hearts, cherries, or “XO”, it’s always a good idea to practice your design on a piece of paper first. This will help you get a feel for the brush or pen, and you can perfect your lines before committing to the candle.
- Work Slowly and Steadily: If you’re painting fine details like cherries or hearts, take your time! Let each layer of paint dry before adding more to avoid smudging.
- Use Thin Layers of Paint: To avoid drips or thick spots, use thin layers of paint and let each layer dry before adding another.
Why You’ll Love This DIY Craft:
DIY Candle Painting is the perfect Valentine’s Day craft because it’s easy, personal, and can be customized for any occasion! Whether you’re crafting for yourself, hosting a cozy girls’ night, or making a thoughtful gift for a loved one, these hand-painted candles are sure to bring warmth and charm to any space. Plus, they make for a perfect addition to your holiday table setting or home decor. Pair them with a cute set of matchbooks for a complete DIY gift!
For more DIY craft ideas, follow along for my dried flower bookmark DIY!