
This week was a deep dive into researching options on how to actually bring my vision to life. The biggest build of this project will be the built-in bookcase so I started by scouring the internet for inspo photos; reading tutorials on various methods; asking questions to DIYers who have done it before (thank you, Remington Ave; Dash Lifestyles; Hand Makes Home!) … and finally make a game plan of my own. Today’s post is going to be a summary of options for built-ins, approximate cost, pros and cons of each option, and why I ultimately decided on the IKEA Billy bookcase hack.
Option A: DIY the whole thing
I’ve built up enough DIY skill to build a bookcase from scratch – but that would require a LOT of time and sweat equity maneuvering large pieces of plywood, ensuring perfect cuts; ensuring perfectly built boxes; etc. On a six week timeline for this challenge, I knew I’d need a short cut so I ruled out this option pretty quickly. (I’m still keeping it in the running for future built-in projects…!)
Option B: IKEA Billy bookcase + trim
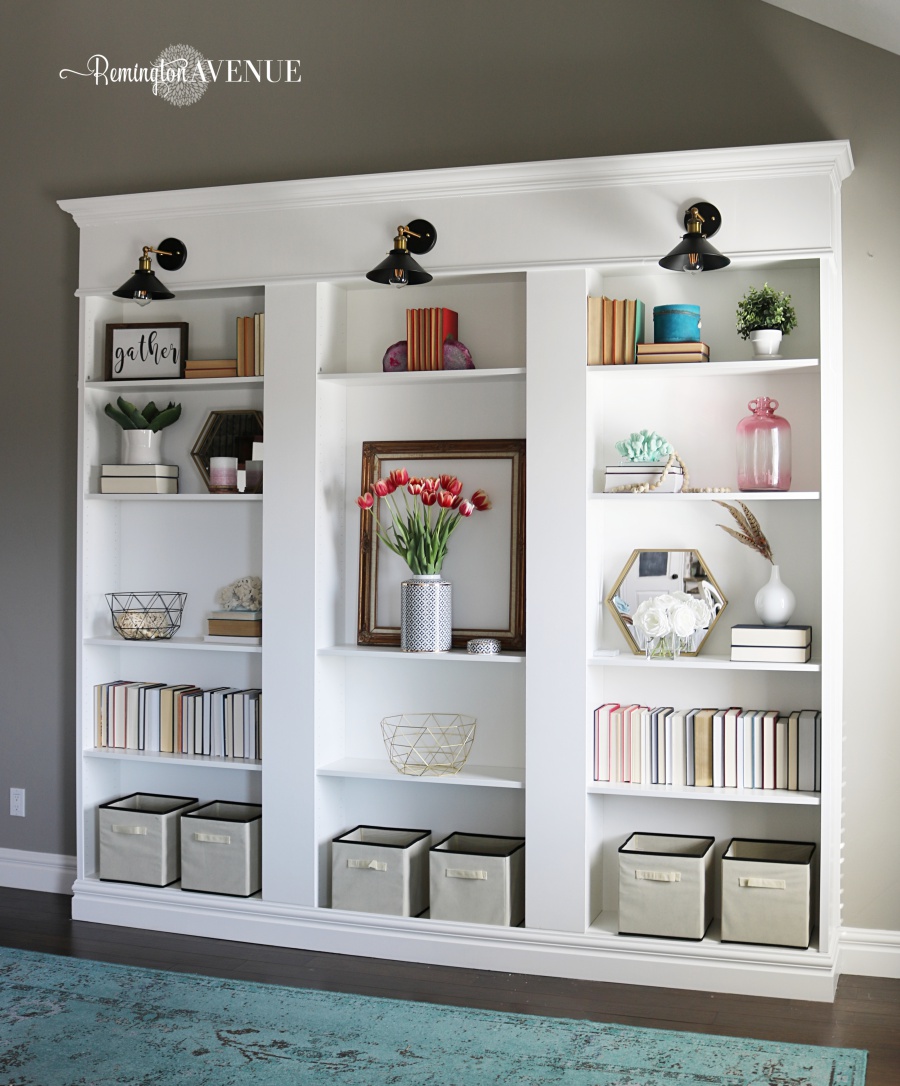
There are lots of amazing IKEA Billy hacks out there but being the maximizer that I am, I had to quadruple check that this was going to be the best option for this particular project.
- Pros: Cheap ($59 for a 31” x 79” white bookcase)! Lots of pre-made add-on options (e.g. extension unit if you have high ceilings; lots of solid / glass door options). Easy to trim out because it is a plain rectangle.
- Cons: It’s particleboard. My husband was worried about quality – but I asked four people who have used Billy’s for their bookcases years ago and they all said it’s holding up perfectly well! My SIL says her 20-year-old Billy is still going strong. 🙂
Option C: IKEA Sektional (kitchen high cabinets) + trim (haven’t seen this option done for office storage yet)

The IKEA kitchen cabinet line is becoming very popular – and for good reason.
- Pros: There are a ton of customization options and the quality of these cabinets are actually much stronger than what you may think of when you think of IKEA. The reason is that the Sektional is made of fiberboard (MDF), not particleboard. The sales rep said the shelves can hold up to 80 lbs compared to 50 lbs for the Billy. Overall, it just feels more sturdy. I considered the 15” deep x 90”H option to make a wall of fully closed cabinets. If you want to go even fancier, a ton of beautiful custom fronts that are designed to work with the Sektional are available via Semihandmade.
- Cons: Limited width options for the narrow depth I wanted. I was looking for 30” wide but the max is 24” which would end up looking choppy / not maximize the space available on my wall. The 24” deep units do come in 30” wide but that is really really deep (think your lower kitchen cabinets). I also wanted a mix of closed cabinets and open shelving and this wasn’t really an option. Plus, the cost of these units would have been about 4x the Billy — and if I went with Semihandmade fronts, the cost would have skyrocketed pretty quickly and there’s a production timeline that wasn’t fast enough for this project.
Option D: Stock unfinished kitchen cabinets as a base + DIY upper shelves
I fell in love with Lauren’s built-ins. She and Thifty Decor Chick used upper kitchen cabinets which are narrower than lower cabinets as the base for the bookshelf and then DIY’d the top shelves. I also considered using base cabinets and somehow adding Billy’s on top (I’m really trying to avoid cutting all the pieces for the bookcase part) but I felt like it wouldn’t be worth the hassle of combining two hacks and the sizing didn’t match up.
- Pros: Solid wood; stock cabinets relatively affordable and saves you a ton of time and gives you a perfect base; DIY’ing shelves means you can size them exactly the way you want
- Cons: Time consuming to cut and build all the shelves. Must have at least intermediate DIY skills.
Final Decision!
Ultimately, I am sticking with my original plan of hacking IKEA Billy bookcases because the value, time saving, and customizing options really cannot be beat! Every project’s criteria is different – I want to spend more of my time on the “hacking” and design side of things for this One Room Challenge. I already planned to add trim and possibly lighting… and now I’m also hoping to add two other fun design elements…. A library ladder and custom building door fronts with radio net caning! I’ve always looooved the look of libraries and I think this will add the perfect amount of warmth to this moody bookcase feature.
ORC Week 2 Progress


I bought three large Billys (and extension units) and one narrow one. I came home tonight after a day trip to Memphis thinking I would just tape out the measurements to see how it would all fit together… but, I decided to just go ahead and build them all! It’s SO much easier to visualize in 3D especially because there’s a corner unit and I wasn’t sure how the angle would impact the measurements. I do love the look of this with the corner… but it also feels kind of cramped. What do you think? Corner (maybe size down the shelves to make it smaller??) or no corner? Next up will be picking trim!


I really like the look of the corner piece! It gives it a more finished look and feels like a custom fit. Maybe use trim to make it transition into the doorway on the left? I’m looking forward to see what you do